Published on 30 September 2019
Posted in
Wooden floors have a charm of their own, offering a look that is both classic and beautiful. Homeowners have tens of options to choose from, and depending on their budget, a lot of choices are available. Wooden floors are not only affordable but also have easy maintenance. Sanding and refinishing hardwood floors keep them in good condition, ensuring that your home is looking beautiful and spotless.
The sanding and refinishing process consist of several steps:
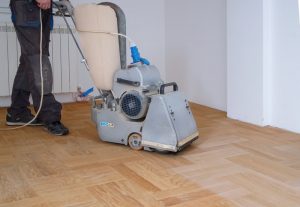
It refers to the use of abrasive material to remove the damaged top layer of the wood. Using 60-grit belt sandpaper on a sanding machine can get you excellent and quick results for a first pass. You can also hire a machine if floor maintenance is a DIY project for you.
The central area of the floor can be cleaned using an ordinary machine while sanding the edges, however, you would need to use an edge sanding machine which has a smaller head to reach the corners and complete the job. Attach the sanding belt to the machine and turn the device on. In slow and smooth motions, use the machine back and forth on every area until you get the desired results. After the central area has been done, use the edge sander with the same grit sandpaper and complete the first pass.
Following a first-pass with a coarse abrasive, future passes require less coarse sandpaper and will ensure that you can get a smooth floor. A higher grit number represents finer abrasive. Make passes with 80 grit and 100 grit sandpaper, and even further, as per your requirement.
Having finished sanding, your floor will look clean and the wood light in appearance.
Use a handheld sander to work on the corners, and there is hardly any need to go above 50 grit in the first pass. Use about 80-grit in the second pass to make the edges finer.
Sanding the floor leaves it quite rough despite the choice of sandpaper. One or two rounds of buffing, however, will get the surface even. Buffing also uses significantly low force on the wood.
Use a vacuum cleaner slowly and thoroughly to remove all the particles of wood generated during sanding and buffing. After one pass of vacuuming, let the dust settle down for 30 minutes and then have another pass of vacuum cleaning to remove all residual wood particles.
A layer of varnish will start to restore the shiny appearance of your wooden floor. Use a good quality roller and good quality varnish, suitable for your wood, and make several passes to have a thick layer applied on the floor.
Use extremely fine grit (e.g. 120 grit) buffing to remove surface irregularities and restore smoothness.
Another pass of vacuuming will be required to get the floor cleaned from all the particles generated during the final buffing process.
Your floor is now shiny and refinished and should look beautiful as new. You may be required to deviate a little here and there. This depends on the wood and the condition of your floor, but the process remains the same. Hiring machines to do this is a cheaper way to get it done, and should just be a weekend job. Hiring a professional to do this, however, will cost you five times the amount for little differences in quality.
Thank you for reading our blog post. If you are looking for floor sander hire, call us today on 0208 427 6604, or visit our contact page.
2025 ©Floor Sander Hire London. All Rights Reserved. Company No: 04545051
Web Design and Marketing by Loop Digital